Jump to content


Photo

Ways to paste shells


  • Please log in to reply
41 replies to this topic

#31 digger

digger

    Pyro Forum Top Trump!

  • UKPS Members
  • 1,961 posts

Posted 22 December 2009 - 01:02 PM

So digger would you recomend trying 25g per 200g shell looking at those numbers?

Dumper


Assuming that the muzzle velocity is proportional to the lift charge (probably a good enough assumption) then you would get a flight time of 7.6 seconds with an apogee of 70m and a time to apogee of 3.5 seconds. This would be about spot on in terms of height and you would be able to fuse for 3 - 3.5 seconds which again is about right.

So yes 25g of your lift sounds about right.
Phew that was close.

#32 Atom Fireworks

Atom Fireworks

    Pyro Forum Regular

  • General Public Members
  • PipPipPip
  • 388 posts

Posted 22 December 2009 - 01:43 PM

Assuming that the muzzle velocity is proportional to the lift charge (probably a good enough assumption) then you would get a flight time of 7.6 seconds with an apogee of 70m and a time to apogee of 3.5 seconds. This would be about spot on in terms of height and you would be able to fuse for 3 - 3.5 seconds which again is about right.

So yes 25g of your lift sounds about right.


Cheers fella, you sound like a handy guy to know. I will be making a few over the crimbo holidays so i will use the 25 g for a 200g shell, so roughly 12.5% lift. I will let you now how i get on and if i can get a video i will.

Will the 12.5% also apply to a 5 inch.

Many thanks, Dumper

#33 Guest_PyroPDC_*

Guest_PyroPDC_*
  • Guests

Posted 22 December 2009 - 01:52 PM

thank you digger for that. very useful indeed.


i tried this with some recent bp tests on pyro golf. As i only got the full flight time this is very useful to show me the time to apogee.


many thanks
pyropdc

#34 Mumbles

Mumbles

    Pyro Forum Regular

  • General Public Members
  • PipPipPip
  • 955 posts

Posted 22 December 2009 - 08:40 PM

The real deal (commercial BP), you should be able to use 1/16. An ounce per pound as it were if you like imperial units. You need to use a slightly finer material (4FA, -12+20) to get by with the same amounts in shells weighing less than a pound or so.

#35 digger

digger

    Pyro Forum Top Trump!

  • UKPS Members
  • 1,961 posts

Posted 22 December 2009 - 09:48 PM

Cheers fella, you sound like a handy guy to know. I will be making a few over the crimbo holidays so i will use the 25 g for a 200g shell, so roughly 12.5% lift. I will let you now how i get on and if i can get a video i will.

Will the 12.5% also apply to a 5 inch.

Many thanks, Dumper


I guess you will need less than this, because as the shell size increases you need less powder comparatively. This is due to several reasons such as increased mortar pressure due to the weight of the shell, increased mortar length, lower required muzzle velocity as the shell is effected less by drag than a smaller shell. It is worth bearing in mind that a courser grade is needed as the caliber increases so that the powder keeps increasing the pressure behind the shell as it moves up the mortar rather than completely burning before the shell has traveled the full length of the mortar.

Many people will compare home made to commercial BP, this can be useful. However it all depends on how you are grading your BP. It would be wise if you are not doing so already to get a set of sieves at the right sizes so that you can grade your powder to the same grades as commercial grades. This will help you to get some consistency in your product you may then approach the theoretical 1/16 that some quote as your powder may be coarser than than the commercial grade used in 3" shells.


thank you digger for that. very useful indeed.


i tried this with some recent bp tests on pyro golf. As i only got the full flight time this is very useful to show me the time to apogee.


many thanks
pyropdc


Glad you liked it. I will update it when I get a chance with a few interesting features so that you can work out the fusing window (the shell travels slowly near the apogee). Also I will make it simpler, improve the drag calculation algorithm and speed up the code.

The real deal (commercial BP), you should be able to use 1/16. An ounce per pound as it were if you like imperial units. You need to use a slightly finer material (4FA, -12+20) to get by with the same amounts in shells weighing less than a pound or so.


It is even possible to better this 1/16th figure with home made BP as I am sure you will agree. But I guess size grading has allot to do with the performance that many people get with their powder.

Edited by digger, 22 December 2009 - 09:50 PM.

Phew that was close.

#36 Atom Fireworks

Atom Fireworks

    Pyro Forum Regular

  • General Public Members
  • PipPipPip
  • 388 posts

Posted 23 December 2009 - 09:58 AM

I will take your advice and get some sized screens soon as i can, when i went and seen cooperman he also told me that the only way to grade and compare is to use screens. i have not been grading it all just grated it with a cheese grater and had done with it, the grain size really does differ with just grating it and i would guess i have a wide range of sizes all in 1 so it would not be acceptable to put a grain size on my lift.

Many thanks again digger and your advice is much appreciated.

Dumper

#37 Vic

Vic

    Pyro Forum Top Trump

  • General Public Members
  • PipPipPipPip
  • 1,144 posts

Posted 27 December 2009 - 10:29 PM

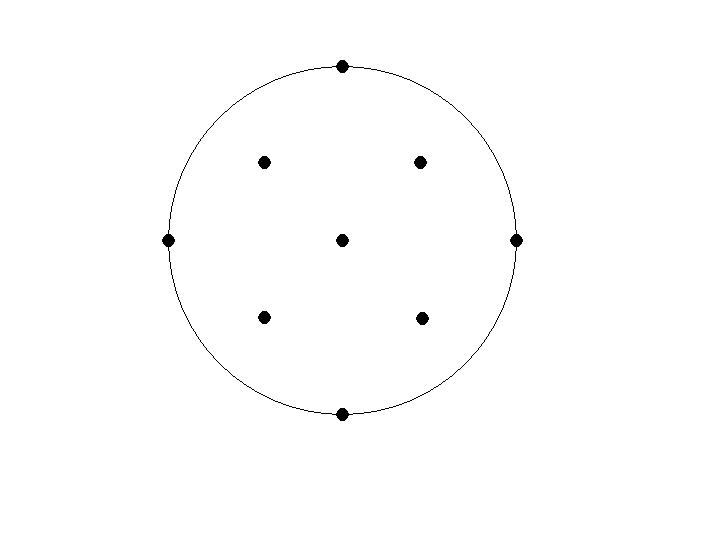
Just to add, pasting can be done by changing the poles method, you start and stop just short of the poles so you don't get such a build up. Overlap by a quarter on the equator so for every four complete pastings you gain one. Go round all the poles once then repeat four more times on any four poles of your choosing, giving you a total of thirteen, with overlap sixteen. It pays not to add more poles as it can get confusing. This is based on 4” shells so on a 3” you would probably get away with just the the nine full pastings.

Posted Image

Edited by fflach, 27 December 2009 - 10:30 PM.

Freud. Artists, in this view, are people who may avoid neurosis and perversion by sublimating their impulses in their work.

#38 sasman

sasman

    Sasman

  • General Public Members
  • PipPipPip
  • 490 posts

Posted 01 January 2010 - 11:50 PM

Hi peeps, a question for all you shell builders out there.

I am having difficulty finding information about how to paste shells properly. I have been using the 3 strip method with success but you are not supposed to get build up at the poles and i am getting that so i presume i am doing some thing wrong. I place 1 strip top to bottom and one next to it over lapping at each pole and in the middle barely touching. i repeat this many times over to get my desired diametre.

Do you guys no of any better ways or even easier ways to do this, some diagrams or maybe point me in the directrion of some online info about it.

Many thaks to those who respond,
Dumper


Hi
I have made only a handfull of paper shells (all 4" diameter) and used gummed paper tape for the layers and from my experience i would not worry about build up on the poles?

Here is a A picture of the finshed shell .. You can see it's slightly oval in shape due to paper build up on the poles but when i fired them they burst pretty symmetrically ..

Here is a link to a Test video ..

These shell were made with no great attention to detail .. The gummed paper strips were wet with a sponge and quickly applied to the shell, Then rolled a few times on a wooden table to get rid off the wrinkles ..I soon got fed up of trying to get rid off all the wrinkles so by time i had done 15 layers i was just slapping on the tape and a quick roll.. that was it...

So i reckon if you can make them quick n easy and they burst good why worry about paper build up?.. As long as each one is made the same way you should have good consistency ..

Cheers

Edited by sasman, 25 October 2010 - 08:22 PM.


#39 Atom Fireworks

Atom Fireworks

    Pyro Forum Regular

  • General Public Members
  • PipPipPip
  • 388 posts

Posted 02 January 2010 - 01:25 PM

Hi
I have made only a handfull of paper shells (all 4" diameter) and used gummed paper tape for the layers and from my experience i would not worry about build up on the poles?

Here is a A picture of the finshed shell .. You can see it's slightly oval in shape due to paper build up on the poles but when i fired them they burst pretty symmetrically ..

Here is a link to a Test video ..

These shell were made with no great attention to detail .. The gummed paper strips were wet with a sponge and quickly applied to the shell, Then rolled a few times on a wooden table to get rid off the wrinkles ..I soon got fed up of trying to get rid off all the wrinkles so by time i had done 15 layers i was just slapping on the tape and a quick roll.. that was it...

So i reckon if you can make them quick n easy and they burst good why worry about paper build up?.. As long as each one is made the same way you should have good consistency ..

Cheers


Yea i see where you are coming from sas, the shells i have made look nearly identicle to your in shape and are good enough for me i just see professional shells are balls and not egg shapes so thought it would be better if it was just as easy to make them spherical with the right techniqe. Good sheels ny the way what prime did you use on the stars where they lancaster reds?

Dumper

#40 Mumbles

Mumbles

    Pyro Forum Regular

  • General Public Members
  • PipPipPip
  • 955 posts

Posted 05 January 2010 - 03:18 AM

The easiest way around pole build up is to not use full length strips. Leave about a 3-5cm hole on each pole for a 4" shell. When you complete a rotation, use a few short pieces to fill in the holes at the poles. I do it this way, and the shells come out pretty much round, and there is really no build up anywhere.

As far as changing the location of the poles, I only use 3 locations up to shells 8" in diameter. I use 3 poles on the axes of and X, Y, and Z coordinate plane if that makes any sense, on the vertices of an octahedron. One that includes the fuse and top of the shell. One along the equator, and one 90 degrees rotated on the equator. I've seen that 9 pole pattern before, and find it not optimal as it will not result in equal coverage. There are 8 big chunks that don't ever get a pole. I'm not saying that it won't work though. There is a 7 pole pattern that gives somewhat better coverage. Every pole is equidistant from it's nearest neighbor. It's just the diagram that fflach posted with the additional poles rotated 45 degrees, which removes 2 sets.

Posted Image

#41 paul bradley

paul bradley

    New Member

  • General Public Members
  • Pip
  • 3 posts

Posted 18 May 2012 - 06:31 PM

Im going to invest in the WASP pasting machine. Its about 2000.00 US $ but it will be worth it for me. Right now I dabble with the 8 and 12 inch shells. Hemis can run a lot of money depending on where you buy them. LOL I just went to the craft shop here at RAF Lakenheath and made me some 7.5 inch wooden balls. Im on my second and I plan to make 11 and 11 11.5 wooden balls to. Its costing me about 21.00 USD $ a ball. Ive made several news paper hemis like the japanese in the States with these wooden balls using free news paper and a purchased 15 pound bag of wall paper paste made the cost per hemi around 15 cents! When I finsh my balls (LOL) im gonna see what my production of shells (hemis) will be. Im estimating a hundred per week. More to follow on that.

On another note, I and my wife enjoyed my first UKPS convention at the begining of May. If i can help anybody with anything drop me a line!

paul.bradley@lakenheath.af.mil

#42 starseeker

starseeker

    Pyro Forum Regular

  • UKPS Members
  • 859 posts

Posted 21 June 2012 - 07:51 PM

It was a pleasure to meet you and your wife paul,it is great to see new faces at our events.


0 user(s) are reading this topic

0 members, 0 guests, 0 anonymous users